Thursday, March 14, 2013

Starting a Garden from Seeds

Farmer Deb (on left), maybe age 8?
My first experience with germinating seeds was when I was about 5. A neighbor had cleaned out their attic and tossed everything out on their curb for trash pickup. The local rug rats (myself included) thought we'd died and gone to heaven. We went through the entire pile and found loads of treasures. One that I found was an unused kid's plant growing science experiment kit. It had little clear plastic pots, vermiculite and some radish seeds. When I planted the seeds and they sprouted, I was fascinated with the entire process. Imagine having nothing more than dry dirt and some brown specks and water turn into living, green plants! For years after that I tried to make terrariums in an old 5 gallon fish tank with garden soil and some seeds I'd swiped from our canary's food dish. When we no longer had Tweety Bird, I would go through our spice cabinet looking for seeds to grow. Actually, I still do that!

Proof that I have a green thumb!
I survive the majority of winter by planning my next garden. Usually after Christmas the seed catalogs start coming in the mail and I'm like a little kid, decades ago, with a new Sears Catalog, closely examining the "enhanced" photos of glorious healthy vegetables at their peak. After a couple of weeks I come to my senses and order only a few packets of things that I know will grow in my garden. Colorado has a very short growing season and so I focus on vegetables that have the shortest growth times from planting to harvest -- less than 60 days. I look for the most disease-resistant varieties I can find, without going down that GMO road. Some seeds I don't even need to buy. If I buy a particularly nice organic winter squash, I'll save some of the seeds for the garden. I've also done this with peppers and tomatoes in the past, but ran into problems with wilt. Most of the time the vegetables I buy in the grocery store have been grown in different areas in the U.S., or otherwise, and may not have resistance to certain organisms found in Colorado. Or maybe they were grown in greenhouses in more sterile conditions. Last year my gorgeous Black Krim tomato plants grown from a Whole Foods tomato purchase succumbed to Fusarium Wilt, just as the tomatoes were growing. It was seriously disappointing. On the other hand, I've had really good luck with seeds I saved from a package of Cherub tomatoes. Those little tomatoes are delicious and the plants are incredibly prolific.


My personal priorities for buying seeds and nursery plants are:

1. Vegetables that I use the most get top priority. Once in a while I'll try something on a whim, like last year's stevia plant. It did well, I dried the whole thing at the end of the summer, and it's still sitting in my pantry with the tea. But I know that all year long I use tomatoes in many, many soups and sauces. We love fresh green beans and they are easy to grow and can be prolific. Summer squash is versatile and I use it often. There are a lot more varieties available by seed than in the grocery. I use a lot of Anaheim Chilis for green chili (we char them on the gas grill) and a favorite soup recipe. We love broccoli and use it a lot: steamed, raw, in other dishes. I use broccoli leaves like chard or collards, steamed or sauteed. There are actually a lot more edible veggie plant parts than we are lead to believe! I also grow herbs that I use a lot: basil, parsley, oregano, thyme, rosemary, bay, lemon balm. What I have left over in early fall can be dried or preserved in other ways. I have to say I've become fond of keeping just one celery plant in the garden. I don't use celery all that much, usually a couple of stalks here and there in a recipe and have had store bought celery go bad. A living celery plant all summer is very handy, I just go out and rip off what I need and rest continues to grow. And the flavor of home grown celery, like a lot of other produce, is amazing.

2. Plants that have a short growing period vie for first priority. With tomatoes and peppers, I start the seeds indoors at the end of February. Other plants are started based on their harvest times, some seeds even get planted directly into the soil. Still working on the timing of those, but they tend to be carrots, lettuce, arugula. I need to pay more attention to Mom Nature and note which plants resulting from reseeding (seeds dropped from the parent plant the previous summer) start up. I've had arugula, carrots, tobacco, some flowers, oregano and dill do this. Tomatoes reseed, but too late to produce fruit. They haven't caught on yet.

3. Plants that are hardy, again very important! Another major consideration. I typically don't grow things that I know won't grow here. I also choose resistance to as many diseases as possible without going GMO.

4. Vegetables, fruits and herbs that can be preserved. Whether by freezing (broccoli, summer squash, various peppers and basil in a pesto sauce); canning and/or pickling such as tomatoes, apples, pickled cukes and okra, green beans, grapes; dehydrating such as tomatoes, herbs, garlic; culturing such as cabbage for sauerkraut, carrots, leafy greens, radishes, kohlrabi; or "root cellaring" like green tomatoes, root vegetables and winter squash. Why should you only reap the benefits of an organic garden during the short summer season?

Starting from seeds vs. buying seedlings - some FAQs
Why buy seeds vs. seedlings? My first thoughts are: more variety, monetary savings and the pleasure of growing something yourself. I've been starting my own plants for decades, but when early summer hail storms destroy everything I've worked towards, I end up replacing my home-grown plants with store-bought ones. On the up side, buying store-bought usually means getting what is hardy for where you live. But, there's also the lack of variety involved with buying store plants. Yet, if a hail storm has destroyed my garden I'd rather go boring than go nothing at all. If cost is an issue, consider that an entire package of seeds costs less (usually) than buying one commercial seedling.

What's involved with growing from seed? Growing plants from seed is interesting, rewarding and fairly easy. My favorite incubator is one of those plastic trays with a clear plastic lid, 6-cell trays fit inside. It just takes some seed starter mix (make sure you use this, it's fine and sterile and a happy medium for seeds), some seeds and water. Starter mix should be mixed with water until spongy. Fill the tray cells with the starter, use a pencil to poke some holes in the dirt, toss in 2-3 seeds and cover with a teensy bit of soil. General rule of thumb is bury the seed with soil 2x the size of the seed. Make sure you mark your trays with a Sharpie or tags so you know what you planted. I put my trays on top of the fridge since the temperature is fairly warm and consistent. Seeds do not need light until they sprout through the soil. Some seeds sprout quickly -- tomatoes can take just 3-4 days, peppers can take a week or two, carrots take forever. If you're in a hurry, a heating pad under the tray helps. Check the seeds every day for growth and water needs. The ones that have sprouted need to be removed from the incubator so they can get some light and air circulation. As they outgrow their little cells, you'll need to transfer them to bigger containers and start introducing your actual garden soil into the mix. Make sure they don't dry out, and add some plant food here and there.

Indoor green beans.
Do you need a grow light? In the past I was able to successfully grow seedlings on window sills, in our sunroom or under fluorescent lights. Last winter I bought myself a full spectrum LED grid light -- the choice of marijuana growers here in Colorado.  I kept track of the growth of the seedlings throughout the winter and was BLOWN AWAY by the results. The plants grew super healthy and stocky in an amazingly short period of time. The plants flowered and I actually had little green beans while the plants were in 4" planters. I am using that same light this year with tomato and pepper seedlings and am again amazed. I have the light on 12 hours a day, on a timer, and my tomatoes and peppers are growing at record rates with NO LEGGINESS at all. Plants that don't get enough light tend to grow tall and spindly (leggy), searching for the light.
In the pot: grow light collards;
on the counter, sunny window grown.
BIG DIFFERENCE!
These plants are deep green, stocky and very happy. Next winter I'm going to experiment with keeping tomato plants alive and producing throughout the winter with my LED light.


Why not collect your own seeds from store-bought produce? As mentioned before, saving seeds from store-bought veggies don't always work out, as some of those plants are just not meant to be grown in my (or your) climate and may succumb to diseases they are not resistant to. There's also that question of how long it takes for the produce to grow from planting time.

Why deal with those little 6 cell packs? Why not just go for a bigger pot to start off? One year, not long ago, I thought, "why not just put those tomato seeds in a big pot and save myself some work?" Well, the little plants spent all of their energy growing roots to fill all that dirt, and never put any thought into growing their above-ground parts. So, there is a real reason to start small and graduate the planter size. At least in our colder climates where growing season is an issue.

Do I need to use seed starter and potting soil for my plants? In the beginning, yes. But to avoid transplant shock when you finally add your plants to the garden, you should have your seedlings in 100% of your garden soil by then. Otherwise you'll slow down the growth (harvest time) of your veggies.

What else do I need to do? The first thing that comes to my mind is don't forget to "harden off" your seedlings. That means to the weather, the sun and to wind. I'm thinking Colorado again. Seedlings, especially those who have not had a grow light, will be a little spindly. If you put them out in the garden without hardening off, they will be shocked by the night time temps, burned by our relentless sunshine and beat to a pulp by our wind. If your plants are spindly, you need to add a fan to their daily routine. The fan will blow on them and cause them to thicken their stems. To introduce your plants to sun and night temps, you'll have to put them outside for for increasing amounts of time so they get used to nature. http://www.tomatodirt.com/harden-off.html You can use this info for all of your seedlings. Kind of makes you wonder how plants have survived without human intervention, doesn't it? Well, the fact is that we, in modern times, grow plants in our climates that otherwise would not have a chance of surviving.

So...

In Colorado, unless you have a greenhouse, gardening is still a crap shoot. There are hail storms. Bunnies. Late freezes and snow. Early freezes and snow. Diseases. Unseasonable weather. Technical difficulties. In the 30 years that I've lived here, even under the worst circumstances, gardens eventually take care of themselves and produce some degree of satisfaction and sustenance. Growing my plants from seed is very satisfying and really not difficult. And when Mom Nature has other ideas, there's always Whole Foods. So, happy gardening and never give up!


Tuesday, February 26, 2013

A Darned Good Dog Biscuits Recipe

Cookie dogs!
There's nothing like a snowy day to make me want to bake. This weekend we still had plenty of bread in the house due to my recipe testing over the past couple of weeks. However, my dog treats supply was pretty low.

I've had a great dog biscuit recipe for maybe two decades, and it's always been a big hit. I haven't made them since I switched our lab Abby to a biologically appropriate raw diet a few years ago to help her recover from months of medical misdiagnoses. The medications prescribed by six different vets took a toll on her, but once I got her on real food she perked right up. She'll be 13 soon.

I was giving Abby jerky for treats until I found out that just about all chicken and duck jerky is made in China and that dogs are getting sick and dying from eating it. No one has determined exactly what the Chinese are doing to the jerky to make it poisonous and it doesn't seem to be a high priority to the pet food world.

I still feel raw meat and bones is the best food for dogs — they are carnivores and can't digest all the garbage fillers that are put in most commercial dog foods. But Abby eats really well and I figure a dog cookie a day is not going to tip her cart. Plus our African Grey parrots, rat and horse love these treats as well. Actually, they are pretty tasty and make the house smell like baking bread!

I use organic ingredients, most of which can be bought on the bulk foods isle at Wholefoods. I mix up a batch (this recipe will fill up three cookie sheets with biscuits), bake, then put half in her cookie jar and the rest in a big baggie in the freezer. These will last months in our house if I don't go crazy giving them away to friends.

I used to have dog bone shaped cookie cutters, but they wore out and I haven't replaced them. Now I just cut the dough into squares using a pizza cutter. It's much quicker and I don't have to keep re-rolling the leftover dough. You can download the dog biscuit recipe here or just take a look at the ingredients by clicking on the screen capture below. Enjoy!

Thursday, January 31, 2013

Everybody Wants My Fanny('s)...

Fabulous recipe for sauerkraut soup

In a former life, my in-laws were Jewish. They still are Jewish, but no longer my in-laws. My grandmother-in-law Fanny was a plump, very short sweet white haired woman who shared recipes with me. Once, back in the late '70s, she was shocked that I'd been using toothpicks to test my cakes. She made her son Terry drive her all over Sarasota, Florida to find a wire cake tester for me. I still have (and use) it today.

I still marvel at the fact that she was named Fanny at birth. It was not a nick name as far as I know. I mean, do you see your newborn emerge from the depths and suddenly think, "this one's a Fanny?" I do realize that Fanny Bryce, a Jewish Ziegfield Girl, was pretty famous at the time. Or maybe Fanny was born breech, like me? Anyway, I digress...

One of my favorite recipes of hers is for Sauerkraut Soup. Most people would never think of making soup from this unusual delicacy. But you would be amazed how delicious it is! Her recipe combines the tang and texture of sauerkraut with meat to balance it out, plus a little lemon juice and honey. I like to add dried mushrooms. Complex flavors and textures that work so well together! Every once in a while I have a craving for it. Also this summer, in my attempt to find various ways to preserve my summer's harvest, I came across recipes for making cultured vegetables. The most common one is to make sauerkraut using only a few simple ingredients: shredded cabbage, lemon juice, water. The good bacteria on the cabbage cause fermentation that turns ordinary cabbage into crunchy, tangy and super-probiotic sauerkraut.

So, what's Sauerkraut Soup without good ol' Jewish Rye bread? I used to make it regularly when I lived in Sarasota, but when I moved to high altitude Denver I gave up in exasperation. But last weekend I got brave. I found a great Hungry Mouse rye bread recipe and high altitude baking adjustments here. Sunday I pulled all of the ingredients together, spent a couple of hours mixing, kneading by hand, etc. and was ready to put my two little masterpieces into the oven. But... my gas oven would not—gasp—turn on! The stove top worked, the broiler worked, even the self-cleaning setting worked. But  it would not BAKE. Wow. With great disappointment I put my two loaves into big baggies, placed them carefully in the freezer and wished them luck.

On Monday we had an repair person take a look at the oven. It was a striker mechanism that had burned out after 15 years of use. $200 dollars later I was back in business. I took one of the frozen loaves out of the freezer and set it on parchment on a cookie sheet. I raised the sheet off the counter to allow the bread to defrost on the bottom as well as all sides. Two or three hours later it was defrosted and had risen a little more. I put some boiling water in a glass baking tray on the bottom shelf of the oven (to make up for our extremely dry air), hand-wiped the bread with raw egg mixed with water and proceeded with the baking directions. About 45 fragrant minutes later I pulled a perfectly browned loaf of bread out of the oven. It lasted about one day in my house. I just pulled the second loaf out of the oven the next morning, repeated the above and had another gorgeous loaf. They were the perfect accompaniment to the soup and also made for fantastic toast in the morning. My thanks to Fanny and the foodies on the Internet that keep me cooking and eating great food! Update: On my second batch I reduced the oil to one TB and added the raw egg/water coating to make a crisper crust and it worked beautifully!


Tuesday, November 6, 2012

Molting Chickens: It Ain't Pretty!


My chickens are about 1-1/2 years old and have stopped laying eggs, but I'm not concerned.

molting chicken
This is a molting chicken!
Click photo for a closer look.
You see, this is fall, when chickens molt. They are losing their old, sometimes tattered feathers and replacing them with new ones. Last year Jenny was the only one to molt and it seemed like her feathers fell out by the hundreds. Some chickens molt that way while others just lose a few dozen feathers here and there. Tiggy is also a big feather dropper. She molted early, in mid August. Flopsy and Mopsy started in early October are taking their time.

Chickens stop laying eggs (ovulating) when they're in a molt. Their bodies need to redirect that energy into making beautiful new feathers. Once they're done molting, they'll start laying again. In the meantime, I've added a little more protein to their diets to help their bodies with feather production. I've been giving them (canned) mackerel or tuna, leftover soups, meats, fish and pasta. No chicken though, I can't go there.

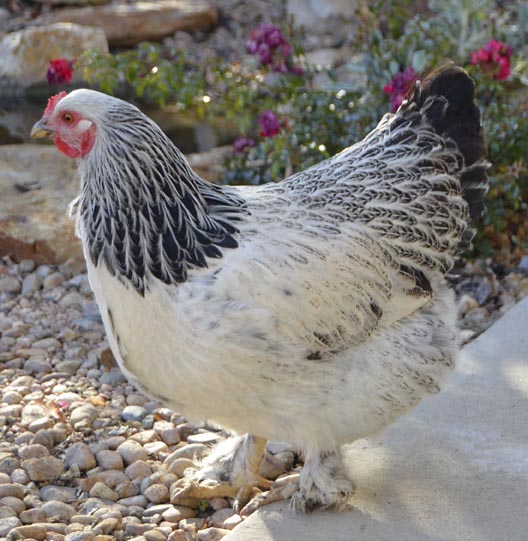
After the molt. Isn't Tiggy gorgeous?
Here are a couple of things I've also learned this year: When chickens are not laying eggs, their combs tend to lose color. My guess is that a chicken's comb is a "flag" to attract roosters when they're ovulating. The girls also don't "squat for the king" when I walk by, another sign they are not ovulating. Tiggy became broody early this summer, sitting in the nest box for months trying to hatch invisible eggs. Her comb also became very pale, she lost her squat and was not laying. Now she's back to normal and I'm just waiting for the rest of the girls to get their groove back! In the meantime I've been buying free range chicken eggs at the grocery story and just hoping that their definition of "free range" is in the same vicinity as mine.

January 2013 update: I was going to put a light in the chicken run after the winter solstice to get the girls laying eggs again. I figured a couple of months off duty would be enough. But to my surprise, about a week after the solstice they started laying again! I guess that teensy extra bit of sunlight kick-started their hormones.

February 2013 update: I noticed this Sunday that the girls' combs were not as bright red as they'd been lately. We were having a snow storm and they were out in the cold and blowing snow. I brought them into our sunroom for a while jus to give them a break. Pretty soon their combs were a luscious red again. So... temperature also affects comb color. 

Thursday, October 25, 2012

Run Chicken, Run!! The Danger in the Sky

This is an update to my ongoing chicken education. A few weeks ago I came home from the grocery store and decided to go out back to check up on the girls. I heard a very loud squawk from behind a tree and my white chicken Tiggy came running out with a hawk running after her. I shouted and the hawk flew up, only to perch on my 6' privacy fence just to the left of the tree. I charged him and he flew back to the fence on the other side of the tree, not wanting to leave his prize dinner behind. I have to say this hawk was about 1/3 the size of my chicken and very focused.

Abby
At this point my geriatric dog Abby stuck her head out the back door. Normally she will chase, slowly but loudly, after any intruders in our yard -- bunnies, squirrels, birds that don't live here, dogs she sees through our fence. But for some reason she didn't notice the hawk on the fence. I started yelling to Abby to "get it, get it" pointing at the hawk. He finally took his eyes off Tiggy when he saw Abby, even though she remained clueless. The three other hens were already in the chicken run (smart girls!) so I shooed Tiggy in and locked the door so I could go in the house and research hawks.

Tiggy looking fierce
Coincidentally the issue of Mother Earth News I had sitting around had an article on sky-borne dangers to chickens. They had a lot of pictures and descriptions of predatory birds, but no solutions as to how to keep them away other than locking up the chickens. Not sure what the point was of that article.

After spending about 20 minutes following leads I found through Google, I learned that (1) hawks are territorial and will not come on a property if another hawk is already there and (2) a lot of people will put up a hawk decoy for this reason.

Bird B Gone
Amazon, as usual, came to my rescue. They have a hawk decoy by Bird B Gone that was recommended by one of the articles for being pretty successful. I have free 2 day shipping with Amazon, so my decoy arrived quickly. He looks good enough to make my chickens very nervous! They recommend moving him around so he doesn't look so decoy-like, which I do. It's been two weeks now and I haven't seen a real hawk yet. Let's keep our fingers crossed!